
Handlebar Mount for Phone/GPS
Install Guide
This product comes with No Tech Support: A complete guide is provided below. Individual tech support is not available. If you can't figure it out from this document, do not buy it.
-
All Sales Final: No returns, exchanges, or refunds will be offered under any circumstances. I am an independent creator, not a big box retailer—I do not have the infrastructure to process returns.
-
Dash View Obstruction: This mount sits directly over the center of your handlebars and will obstruct your view of your Sea-Doo’s built-in dash display. You will have to look over or around it to see your factory gauges (though most GPS apps show your speed).
-
Non-Negotiable Technical Requirements:
You must have a primary phone with an active mobile plan that supports hotspot tethering.
You must know how to set up and enable mobile hotspot tethering yourself.
You must be comfortable navigating Android settings and downloading apps from the Google Play Store.
1. Handlebar Compatibility
This mount fits only Sea-Doo models with a trapezoidal-shaped void in the center of the handlebars. Visually inspect your craft before ordering.
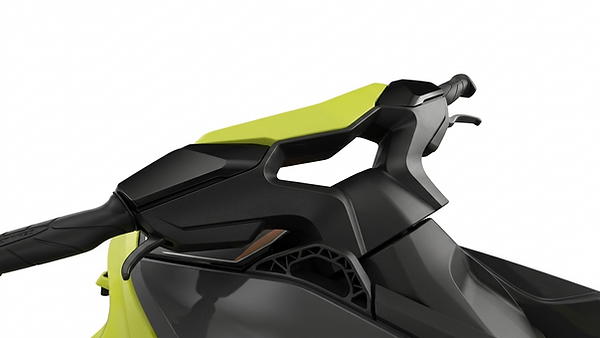
Modle | Year |
|---|---|
GTI 90 / GTI 130 | 2020 – 2026 |
GTI SE 130 / GTI SE 170 | 2020 - 2026 |
GTR 230 | 2020 - 2026 |
Wake 170 / Wake Pro 230 | 2020 - 2026 |
FishPro Scout 130 / Sport 170 | 2022 - 2026 |
GTX 170 / GTX 230 / GTX Limited | 2020 - 2026 |
GTX Pro (Rental/Fleet) | 2021 - 2026 |
The following models are NOT Compatible: GTR-X 300, RXPX, RXTX, FishPro Trophy, ExplorerPro Spark
2. What's Included in the Box
-
Custom Handlebar Mount Base (Black) (A)
-
Screen Surround (In your chosen color) (B)
-
Locking Keys (Black — extras included) (C)
-
Assembly Hardware (Plastic screws — extras included) (D)
-
Mount Buttons (extra included) (E)
-
Motorola Moto G (2025) (Dedicated mount phone; carrier-restricted) (F)
-
Body Glove Waterproof Phone Case (G)

3. How the System Works
Your expensive main phone stays safe, dry, and tucked away in your glove box running a Wi-Fi hotspot. The mounted Moto G connects to that hotspot for internet data while utilizing its internal GPS chip for navigation.
Note: The Moto G is an inexpensive phone. Its screen is not extraordinarily bright in direct sunlight (you may need to shade it with your hand), but if it gets lost or damaged on the water, replacement units are inexpensive, available from a number of online retailers
4. Phone Setup (Complete BEFORE Mounting)
Set up the Moto G in your hands before putting it into the housing.
Step 1: Connectivity & Security
-
Connect to Hotspot: Turn on your primary phone's hotspot and connect the Moto G via Wi-Fi.
-
Lock Screen Security: Settings - > Security & Privacy - > Device unlock
Set the unlock method to None, Simple PIN, or Pattern.
💡 Why? The mount blocks the fingerprint reader, and wet hands make complex passwords frustrating on the water.
Step 2: Mandatory App Downloads (Google Play Store)
-
Marine Navigation App (Pick One) Both require separate subscription.
-
Navionics (Recommended): Natively supports horizontal orientation and provides an optimal marine layout.
-
Wavve Boating: Solid option, but handling screen orientation requires extra effort.
-


-
Touch Lock App (Essential): Water splashes act like physical finger taps on touchscreen displays. You must lock the touch screen while riding.
-
Option A: Touch Lock by Brink Technologies
-
Option B: Touch Lock – Disable Touch by ColdCherry
-
Option C: Any touch-blocking app of your choice from the Play Store.
-


-
Screen Rotation App
-
Recommended: Control Screen Rotation by ah_apps.
-
Purpose: Forces the phone into horizontal mode across all menus. If using Wavve Boating, you can use this app to force vertical orientation temporarily to search for locations (though you'll have to type sideways at a 90° angle).
-

5. Hardware Installation Instructions
5.1 Prepare the Phone: Case Installation.
Remove the Moto G and the Body Glove case from their packaging. Install the Moto G inside the Body Glove waterproof case.

5.2 Position Mount Halves: Base Alignment.
Place the top section of the mount base into the trapezoidal void on the handlebars. Position the bottom section underneath the handlebars. Thread the plastic screws to connect the halves, but do not tighten them yet—leave room to seat the phone (about ¼ to ½ inch).


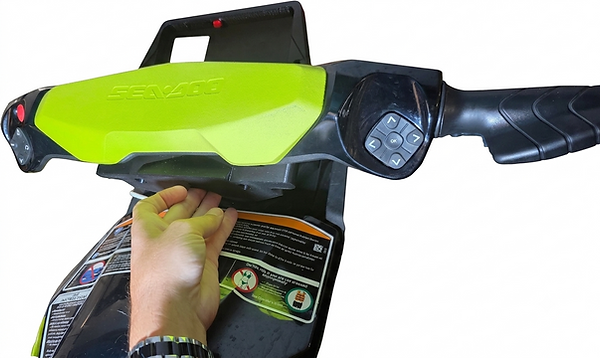


5.3 Insert the Phone: Button Alignment.
Place the encased phone screen toward the driver with the power button at the top. Insert the top edge first, ensuring the physical power button on the Body Glove case fits inside the mount's power button notch. Snap the bottom edge into place.


5.4 Attach Screen Surround: Surround Attachment.
Locate the two top ears on the screen surround. Slide them upward into the slots on the underside of the top of the upper mount (ensure the locking grooves face outward). Press the surround firmly into place.


5.5 Secure with Keys: Hardware Locking.
Insert the locking keys into the holes on both sides of the screen surround and turn them inward to lock the surround into position.


5.6 Tighten Screws: Final Tightening.
Press the upper and lower mount halves together and hand-tighten the plastic screws until snug. Do not overtighten, or you will strip the plastic threads.


6. Extras, Features & Quirks
-
Handlebar-Controlled Gaming: Because the phone rotates with your handlebars, you can play tilt-controlled racing games (like Riptide GP2 or Asphalt) while parked. NEVER play games while underway.
-
Emergency Nav Light: The built-in flashlight is exposed and can be switched on in low-light conditions to increase visibility. This is not a legal Coast Guard navigation light, but it offers some extra visibility in an emergency.
-
Exposed Camera & Dash Cam Use: The back and front cameras remain uncovered. You can record your dashboard gauges or use the selfie camera to record yourself. (Remember: It's an inexpensive phone, so don't expect cinema-grade video quality).
-
Route Tracking: Download the Relive app to track your rides and generate 3D video recaps of your trips.
7. Frequently Asked Questions (FAQ)
-
Q: Can I use my iPhone / Apple device in this mount?
-
A: No. This mount was designed specifically around the Moto G's dimensions. If you insist on using Apple, this product is not for you.
-
Q: How do I set up mobile tethering on my phone?
-
A: If you are asking this question, do not buy this product. Hotspot configuration requires basic technical self-sufficiency that you must provide yourself.
-
Q: Can I use my own Android phone instead of the Moto G?
-
A: No. The housing is specifically dimensioned for the 2025 Motorola Moto G in a Body Glove case. Other phones will not fit properly.
-
Q: Why is the screen sideways or vertical when mounted?
-
A: The home screen and some apps do not always auto-rotate horizontally. You must download a screen orientation app (such as Control Screen Rotation) to force horizontal mode.
-
Q: The phone screen is pressing buttons by itself while riding! How do I stop this?
-
A: Water droplets landing on the glass register as touch inputs. You must install and enable a touch-lock app before taking off.
-
Q: I have extra screws and small plastic pieces in my box. Did I miss a step?
-
A: No. Extra plastic mounting screws and spare locking keys are included in case you drop or lose small hardware.
-
Q: The screen seems dim outside. Is mine broken?
-
A: No. It is a budget smartphone display. In direct peak sunlight, you may need to shield the screen with your hand to read smaller text.
-
Q: Can I get a refund if it doesn't work out?
-
A: No. All sales are final. I am an independent builder, not a retail chain. If you are uncomfortable with a no-return policy, please do not purchase.
-
Q: Why are there design compromises in this product?
-
A: Because commercial marine units cost anywhere from $300 to $2,000+, whereas this system offers a functional DIY navigation setup at a fraction of that cost. If the trade-offs are unacceptable to you, commercial marine options are readily available on the market.
8. Maintenance and Care
-
Rinse mount and plastic hardware with fresh water after riding in salt or brackish water to prevent salt crystal buildup.
-
Do not leave any plastic items in hot environment such a as a car or in direct sunlight as it may warp.
9. Shipping Times
-
Lead Times: All mounts are custom-made to order utilizing externally sourced components. Shipping times may be longer than standard online retailers.
-
Processing time: Usually ships in 7–14 business days.
*Some photos have been digitally enhanced